MINIONVAULT

Miniatures, paints, doodles and wonderfully useless stuff.

  • About

IS-3 tank, part 1 (assembling)

Posted by yansick on March 19, 2015
Posted in: Scale model. Tagged: Military, Models, Scale model, Tanks. Leave a comment

My new tank project: a 1/35 soviet IS-3 heavy tank from Tamiya.

It is a nice kit, quite easy to put together. But it is an “old” kit (released in 1998, or something like that) and as such, it offer fewer details and options than more recent kits. And the kit has vinyl tracks :-(. So I had to do some detailing work, added some wires, handles made from strips of thin metal, plasticard bits, etc. I’m not 100% done, but quite close.

Overall, it is a tank with an impressive look, even more so when you consider that it was developed near the end of WWII (1944). It seems it was not used in combats in WWII, but it was part of the victory parade in Berlin on September 7 1945.

More to come; stay tuned.

Увидимся!   (see you!)

Nice model. Wheels and tracks missing for the moment...
Nice model. Wheels and tracks missing for the moment…
Some putty to fill small gaps at the base of the turret. Tiny strips of metal for the retaining clips on the left fender. Very small gauge wires for the cables to the spotlight and horn.
Tiny loops of metal glued with super-glue and welds made from Magic-Sculpt. The doors for the storage areas were also added (plasticard).
Tiny, tiny welding simulated with Magic-sculpt.
Fuel (?) lines added with small gauge wire (not done yet: the top of the cylindrical fuel containers should have some fuel lines onto them as well).
Detail on the commander's trap door and on the DShK machine gun.
Detail on the commander’s trap door and on the DShK machine gun.

Share this:

  • Share on X (Opens in new window) X
  • Share on Facebook (Opens in new window) Facebook
  • Email a link to a friend (Opens in new window) Email
  • Share on Pinterest (Opens in new window) Pinterest
Like Loading...

You want some desert?

Posted by yansick on March 17, 2015
Posted in: Terrain. Tagged: cake decorations, desert terrain, terrain. Leave a comment

Recently, I’ve built some desert terrain for tabletop use. Simple pieces, mostly made from foamcore boards and stryrofoam.

The interesting thing here, is the use of cake decorations, namely wedding cake plastic columns, to create terrain. I used my trusty Dremel rotary tool to damage them and carve some grooves to suggest individual blocks. I used a piece of plasticard to close the top part, and used scrap parts of metal figures embed in putty to add weight to the bottom (so the columns would be less prone to fall once on the gaming table). The painting was kept to a minimum: yellow-ochre basecoat, followed by a wash of dark brown, then a drybrushing of sand beige.

Boom! Quick and simple!

"The cake is a lie..."
“The cake is a lie…”
Simple but effective architecture.
Just another brick in the wall...
Just another brick in the wall…
Wall closeup.
Wall closeup.
All the pieces together.

Enjoy the pics!


Share this:

  • Share on X (Opens in new window) X
  • Share on Facebook (Opens in new window) Facebook
  • Email a link to a friend (Opens in new window) Email
  • Share on Pinterest (Opens in new window) Pinterest
Like Loading...

Back in black!

Posted by yansick on March 15, 2015
Posted in: Diorama, General, Terrain. Tagged: Diorama, Miniature, Orc, Painting. Leave a comment

An old piece today.

A diorama I made ages ago for a contest at a local gaming store (I won second place btw). Most of the temple is etched plaster covering a wood base.

For the sculpture on the wall, I pressed various figures on a clay sheet and poured plaster of Paris, then etched the brick patterns on it after it was dried. The columns are also made of plaster, poured in… cardboard toilet paper rolls. Yep.

The paint job is ok, but as for most of my older pieces, it consists mainly of layering and drybrushing.

It think the diorama should be viewed as a whole, telling a story: Mama dragon, protecting her eggs, wants to get a free meal from superstitious orcs, who are about to get attacked by a brave halfling thief and a (hopefully) powerful mage.

A jungle scene...
A jungle scene…
Overall view.
Overall view.
Some tension in this scene...
Some tension in this scene…
"Hum... free meal!"
“Hum… free meal!”
"Wait... Something's wrong..."
“Wait… Something’s wrong…”
"Mom! Mom!"
“Mom! Mom!”
"If I can just find that wand now..."
“If I can just find that wand now…”
"Dinner served!"
“Dinner served!”
"Just wait 'till the last moment: It will be more cinematic!"
“Just wait ’till the last moment: It will be more cinematic!”
"Now if that *&# mage could just find his stuff..."
“Now if that *&# mage could just find his stuff…”
3...2...1... Action!!!
3…2…1… Action!!!

Share this:

  • Share on X (Opens in new window) X
  • Share on Facebook (Opens in new window) Facebook
  • Email a link to a friend (Opens in new window) Email
  • Share on Pinterest (Opens in new window) Pinterest
Like Loading...

Hetzer Diorama Done!!!

Posted by yansick on March 9, 2015
Posted in: Diorama, Scale model. Tagged: Diorama, Military, Scale model, Tanks. Leave a comment

Yeah! I’m finally done with my Hetzer Diorama. Like all dioramas projects, there’s still a few little details that bug me, but overall I’m pleased with the diorama. And I can move on to other stuff. My workbench is full of unfinished pieces just waiting some loving care…

Meanwhile, enjoy the pictures:

Overall look...
Overall look…
Overall look...
Overall look…
Brick red pigments helped blending the debris together.
"Was mache ich hier?"
“Was mache ich hier?”
hetzer_done5
I wasn't sure with the syrofoam wall, but in the end it fits quite well.
I wasn’t sure with the syrofoam wall, but in the end it fits quite well.
The ladder helps the composition: it suggest some "forward movement" too.
The ladder helps the composition: it suggest some “forward movement” too.

Share this:

  • Share on X (Opens in new window) X
  • Share on Facebook (Opens in new window) Facebook
  • Email a link to a friend (Opens in new window) Email
  • Share on Pinterest (Opens in new window) Pinterest
Like Loading...

Hetzer Update 4

Posted by yansick on March 7, 2015
Posted in: Diorama, Scale model. Tagged: Military, Scale model, Tanks. Leave a comment

Wow! I’ve been away from this blog for a while: sorry folks! But I am back, and I will start posting cool stuff again!

Beginning with this update on my Hetzer diorama. I’m almost done with the ground work!

Terrain almost done!
Barrel, jerrycan and ammunition
Ground work detail
Ground work detail
Overall view of the diorama
Rear view
Rear view
Destroyed building
Destroyed building

I’ll be ready to apply some pigments as soon as the glue will be completely set. So this diorama is close to be finished! It took quite a lot of time to do the detailing on the terrain (vegetation) but in the end, I am pleased with the result.

In case anyone is wondering, I used Oregano to simulate dead leaves. The smell of spices mixed with white glue is a bit weird, but the effect is quite cool. I did a couple of washes (different shades of brown) to give some depth to the soil and blend it better with leaves and twigs.

Cool! More posts coming very soon!

Share this:

  • Share on X (Opens in new window) X
  • Share on Facebook (Opens in new window) Facebook
  • Email a link to a friend (Opens in new window) Email
  • Share on Pinterest (Opens in new window) Pinterest
Like Loading...

Hetzer diorama update 3

Posted by yansick on July 30, 2014
Posted in: Diorama, Scale model. Tagged: Diorama, Military, Scale model, Tanks. Leave a comment

Quick update: I’ve completed the basic ground work and base coated the soil. I added more debris, made a few small touch-ups and started the vegetation work. I plan to have a lot of high grass around the tank. On the opposite part of the diorama (facing the ruined house) it’ll be mostly dirt and some abandoned stuff (barrels, ammunition boxes, jerrycans, etc).

Adding all that grass is tedious, but the final result will hopefully be worth it.

As for the colours, don’t worry if you think they are still a bit too contrasted: I’ll wait until pretty  much everything will be in place and then use pigments and washes. Some light spraying with the airbrush might also be useful to simulate a subtle coat of dust on the whole diorama. I’ll do some tests beforehand of course, but I think it will be good.

Enjoy the pics!

dio012
dio010
dio011
dio013


Share this:

  • Share on X (Opens in new window) X
  • Share on Facebook (Opens in new window) Facebook
  • Email a link to a friend (Opens in new window) Email
  • Share on Pinterest (Opens in new window) Pinterest
Like Loading...

Hetzer diorama update 2

Posted by yansick on July 28, 2014
Posted in: Diorama, Scale model. Tagged: Diorama, Military, Scale model, Tanks. Leave a comment

I worked a bit on my Hetzer diorama this weekend. I started by making more debris to use on the house ruin.

Individual bricks

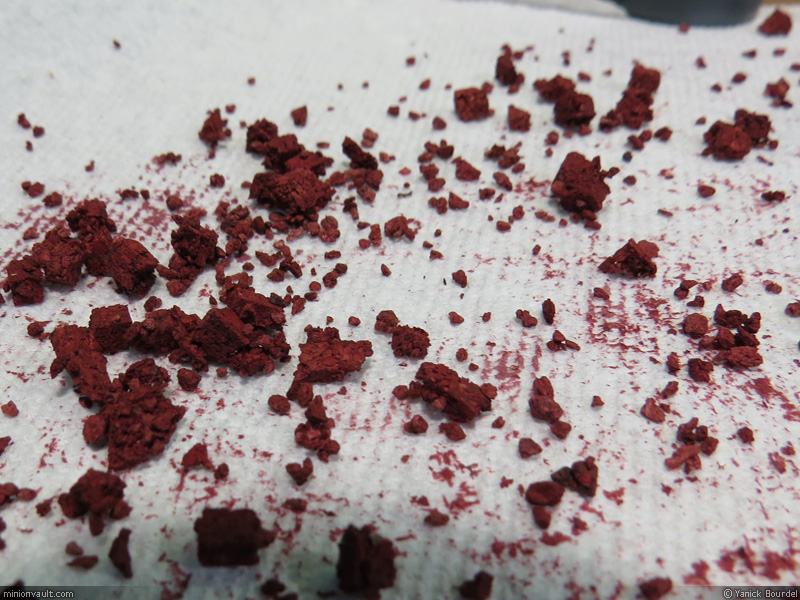
First, I prepared some individual brick using strips of thin cork. These were held to a masking tape band, then airbrushed a warm shade of brown. I later dry-brushed them a bit with 2 shades of red. Then I used a warm pale grey sparingly just to simulate a bit of mortar on the bricks. I didn’t go over the top with blending and weathering, because once these will be glued on the diorama, they will have a wash of earth brown and brick-red pigments all over them.
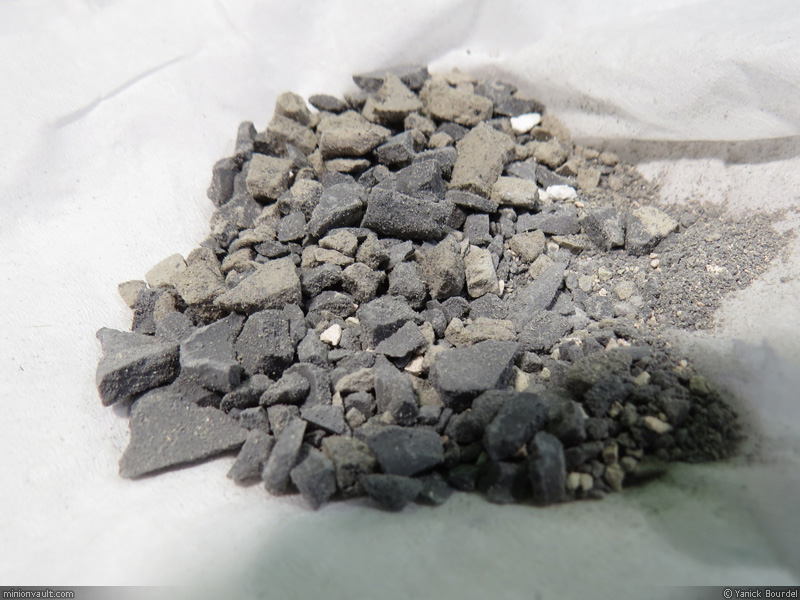
debris001

Concrete

I prepared 2 small mixes of plaster in 2 different cups. In the first one, I added a mix of  black and brown acrylic paints so the plaster will become a warm grey when dried. In the second one, I added only black; that batch turned cool dark grey. Each mix was poured in a soft plastic “tray” in a thin layer (about 5 mm). Once the whole thing was dried, I crushed the 2 batches so to obtain various sizes of “concrete looking” chunks and fragments. I mixed in some crushed cat litter (to simulate plaster fragments and add a bit of variety to the whole mix).

debris003

Bricks chunks

I took some strips of thin cork and cut it in pieces smaller than whole bricks, to simulate broken bricks. This was mixed with talus (little rocks used by railroad modellers) in a cup. I added brick-red acrylic paint, then mixed everything. The trick is to use enough paint so every bits in the mix will get covered, but not too much. If there is too much paint, the little fragments will stick too much one to another and it will be much harder to use later on. Before the paint was dried, I spread the mix on a paper tower, gently “rolling” the pieces on the towel with my fingers so the excess paint was absorbed by the towel.

debris002debris004

Roof / floor “chunks”

When a building collapses, it does not go down with all the material used in its construction now broken in individual pieces. Many bits of material remain “connected” or joined, with nails, cement, concrete etc. It is especially true for the roof and floors. So it is normal to find large chunks of material still bound together among the rubbles. I used some balsa wood to put together 3 “chunks” like that, all broken and weathered.

debris005 debris006

…And so it began!

With all this done, I was ready to start.

First, I used paint (dry-brushing) to give the ground some colours, in case a small area remains visible through the rubbles. Nothing fancy here: earth tones and some brick-red.

debris007

Second, I detailed the back of the building (especially the floor and what’s underneath). The wooden structure of the floor is mostly balsa, but I used popsicle sticks for the floor and plasticard sheets for the mouldings.

Then I started carefully laying down various bits of debris (bricks, planks, concrete, plaster, rusty pipe etc).

debris009

Everything is glued with white glue, and in case you’re wondering: Yes, every bit at this stage is placed individually, one by one. Tedious, but I want more control.

Third, I started the same process in the front of the building. So far, so good.

debris008

It still need more debris: Collapsed buildings produce an unbelievable amount of debris.

Don’t worry if you think the colours are a bit too contrasted and are lacking some “unity”: when all the debris will be in place, a good wash and pigments will help tie everything together.


Hope it inspires someone.

Share this:

  • Share on X (Opens in new window) X
  • Share on Facebook (Opens in new window) Facebook
  • Email a link to a friend (Opens in new window) Email
  • Share on Pinterest (Opens in new window) Pinterest
Like Loading...

Hetzer diorama update 1

Posted by yansick on July 25, 2014
Posted in: Diorama, Scale model. Tagged: Diorama, Military, Scale model, Tanks. Leave a comment

Not much this time. Just a quick update to show the progress on my Hetzer diorama. Enjoy the pics (and the comments)!

I used a piece of masonite to provide a straight surface for the tank tracks. I used hot glue to glue that to the plastic base.
I smoothed the edges and angles with epoxy putty (Magic-Sculpt).
Detail view of the rubbles in the back of the building. More rubbles to come, but it's a start...
Detail view of the rubbles in the back of the building. More rubbles to come, but it’s a start…
... I rubbed the putty so hard, that my nail cut trough the skin! Now my DNA is embedded in the putty for future archeologists to discover :-)
… I rubbed the putty so hard, that my nail cut trough the skin! Now my DNA is embedded in the putty for future archeologists to discover 🙂
When the putty was a little bit hard, I used my favorite rock to imprint irregular patterns (useful to hide the inevitable fingerprints also...)
When the putty was a little bit hard, I used my favorite rock to imprint irregular patterns (useful to hide the inevitable fingerprints also…)
With a wire brush, I gave some texture to the areas that were too flat. In the end, there will be so much rubble and dust all over the place that I am not sure this step is needed, but...
With a wire brush, I gave some texture to the areas that were too flat. In the end, there will be so much rubble and dust all over the place that I am not sure this step is needed, but…
Quick test with the tank in place. Good. It is going the right way! :-)
Quick test with the tank in place. Good. It is going the right way! 🙂

Share this:

  • Share on X (Opens in new window) X
  • Share on Facebook (Opens in new window) Facebook
  • Email a link to a friend (Opens in new window) Email
  • Share on Pinterest (Opens in new window) Pinterest
Like Loading...

Ruins, rubbles… and some progress

Posted by yansick on July 14, 2014
Posted in: Diorama, Scale model, Terrain. Tagged: Diorama, Military. Leave a comment

I am working on ruins and details for my Hetzer diorama project. Enjoy.

Ruined house (front), made of blue foam, foamcore board, balsa and sparkle.
Ruined house (back), made of blue foam, foamcore board, balsa and sparkle.
The 'pillar' part of my ruined house was too high to my taste, so I broke it. I will use fragments such as this one as 'chunks' of broken brick structure still held by mortar.
The ‘pillar’ part of my ruined house was too high to my taste, so I broke it. I will use fragments such as this one as ‘chunks’ of broken brick structure still held by mortar.
Various bits for the rubbles: a ladder, german jerrycans, pipes and a motorcycle. The motorcycle will need more attention (chipping, washes, pigments for the tires...)
Various bits for the rubbles: a ladder, german jerrycans, pipes and a motorcycle. The motorcycle will need more attention (chipping, washes, pigments for the tires…)
A tire for the rubbles. Weathered with pigments (the pigment fixer is still wet on this image).
Various bits. 'Metal' scraps (mostly plastic in fact), wood planks (balsa), and bricks/rocks made of foam and cork.
Various bits. ‘Metal’ scraps (mostly plastic in fact), wood planks (balsa), and bricks/rocks made of foam and cork.
With a bit of left-over putty, I made a cloth to add some kind of focus to the box containing ammo crates.

Share this:

  • Share on X (Opens in new window) X
  • Share on Facebook (Opens in new window) Facebook
  • Email a link to a friend (Opens in new window) Email
  • Share on Pinterest (Opens in new window) Pinterest
Like Loading...

Green is the new blue

Posted by yansick on July 13, 2014
Posted in: Diorama, Painting. Tagged: Diorama, Miniature, Miniatures. Leave a comment

I thought it would be nice to share some pics of a dragon mini I painted eons ago. It is an old dragon miniature, from Grenadier (same collection as my blue dragon in this other post). What is interesting here I think is the use of 2 unusual objects for the diorama: the base of an antique desk lamp and a glass globe, used for exterior porch lamps. The diorama of the dragon, complete with the tree and dead horse, was made on a small round piece of plastic, glued with epoxy to  the metal lamp base. The glass globe is held in place with plumber putty, but It could have been “glued” with silicon or even epoxy. Overall it is quite an impressive piece and looks terrific in my office. I hope you enjoy it to.

green_dragon01
green_dragon02

Share this:

  • Share on X (Opens in new window) X
  • Share on Facebook (Opens in new window) Facebook
  • Email a link to a friend (Opens in new window) Email
  • Share on Pinterest (Opens in new window) Pinterest
Like Loading...

Posts navigation

← Older Entries
Newer Entries →
  • Quote

    A person who never made a mistake never tried anything new. - Albert Einstein
  • Recent Posts

    • I am still around :-)
    • Frostgrave – Dark Alchemy – Scenario 3
    • Frostgrave – Thaw of the LichLord – Scenario 2 – Battle on the River
    • Frostgrave – Dark Alchemy – Scenario 2
    • Frostgrave – Dark Alchemy – Scenario 1
  • Archives

    • August 2024 (1)
    • January 2024 (2)
    • October 2023 (1)
    • September 2023 (1)
    • July 2023 (1)
    • December 2022 (1)
    • October 2022 (1)
    • September 2022 (1)
    • February 2021 (2)
    • October 2020 (2)
    • June 2020 (1)
    • March 2020 (2)
    • February 2020 (1)
    • January 2020 (5)
    • May 2019 (3)
    • January 2019 (1)
    • December 2018 (3)
    • April 2018 (2)
    • January 2018 (1)
    • October 2017 (4)
    • September 2017 (1)
    • August 2017 (1)
    • May 2017 (2)
    • April 2017 (3)
    • March 2017 (2)
    • January 2017 (2)
    • December 2016 (2)
    • November 2016 (4)
    • October 2016 (3)
    • September 2016 (3)
    • August 2016 (4)
    • June 2015 (1)
    • April 2015 (2)
    • March 2015 (9)
    • July 2014 (7)
    • June 2014 (5)
    • May 2014 (2)
    • January 2014 (3)
    • October 2013 (2)
    • September 2013 (10)
    • August 2013 (13)
    • June 2013 (9)
  • Categories

    • Diorama (38)
    • Frostgrave (7)
    • General (5)
    • Painting (23)
    • Photography (2)
    • Rime of the Frostmaiden (1)
    • Scale model (70)
    • Sculpting (18)
    • Step by step (6)
    • Terrain (29)
    • Uncategorized (2)
  • Tags

    Alcyon Alien Barbarian Base cake decorations Camera Canon PowerShot Colonial Marines D&D desert terrain Diorama Fallout Foamcore Frostgrave Games Workshop Gaming Table Goblin Military Miniature Miniatures Models Mold mortar Narcissus Orc Paint Painting Photography post-apocalypse Resin casting Rime of the Frostmaiden Savage Worlds Scale model sci-fi Scratch Build Sculpture Skeleton skull Star Wars step by step Tabletop Tabletop game Tanks Tarrasque terrain Tomb Kings Tools Troll tutorial Warhammer wasteland zombicide zombie
  • Blogroll

    • Armorama
    • coolminiornot
    • Dakka Dakka
Blog at WordPress.com.
MINIONVAULT
Create a free website or blog at WordPress.com.
Privacy & Cookies: This site uses cookies. By continuing to use this website, you agree to their use.
To find out more, including how to control cookies, see here: Cookie Policy
  • Subscribe Subscribed
    • MINIONVAULT
    • Join 34 other subscribers
    • Already have a WordPress.com account? Log in now.
    • MINIONVAULT
    • Subscribe Subscribed
    • Sign up
    • Log in
    • Report this content
    • View site in Reader
    • Manage subscriptions
    • Collapse this bar
 

Loading Comments...
 

    %d
      Design a site like this with WordPress.com
      Get started