Here it is! A dirty Soviet Steel Monster on a muddy and snowy Russian field.
I took more photos than usual to get a good view of the snow/mud effects, which I enjoyed making. I am quite pleased with the results.
Enjoy the pics!


Here it is! A dirty Soviet Steel Monster on a muddy and snowy Russian field.
I took more photos than usual to get a good view of the snow/mud effects, which I enjoyed making. I am quite pleased with the results.
Enjoy the pics!
Sorry everyone: I didn’t take photos of the painting an weathering steps of my ISU-152 diorama. This is just the final result.
The painting of the base began with a few dry-brushing of dark blue grey, up to a light brown-grey.
I then used various pigments, with alcohol as a temporary fixer. When I was satisfied with the pigments, I dabbed matt varnish onto the base using a soft brush. Once dry, I used the airbrush to slightly darken an lighten some areas.
With various diluted shades of blue grey and greenish grey, I went over some individual rocks to break the monotony of the cobblestone pavement. I then dropped some twigs, hemp rope fibres and small rocks, to dirty up the road.
The manhole cover, the drain grid and the tram rails were given a brown coat, followed by rust and pale dust pigments with a final metallic highlight (dry-bushing with gun-metal acrylic).
For the newspapers, I searched the web to find real examples of WWII german newspapers and printed them to scale on my laser printer. I soaked them in diluted white glue and apply them to the base. When they were dry, I used an earth coloured wash to make them look dirty and old.
I then spayed 3 generous coats of matt varnish on the whole diorama with the airbrush to seal everything and bind the pigments.
The tramway post is from Mini-Art and the wires are scratch builded from thin metallic wire.
The Nazi flag was made from Magic-sculpt and carefully painted. I think it adds a nice touch of color to the diorama and goes really well with the red star on the tank.
Finally, I added tiny dead leaves (dried Oregano…) to the base and the tank.
Enjoy the pics!


I received my order from Precision Ice and Snow. Since I was quite disappointed with my previous attempts at making realistic snow (take a look here). I decided to give this company’s products a try. So I got my Krycell snow by the mail and went to work on a brand new test diorama.
I am VERY pleased with the results. The stuff is simply amazing! It’s a very fine powder, similar in consistency to cooking flour I would say. I simply sprayed matt varnish on the base and used the provided stainless steel sieve to dust the Kycell on the fresh coating of varnish. I then quickly builded up many layers by spraying again and dusting many times. The stuff builds up like real snow. And I live in Canada, so I know very well how snow looks like 🙂
I also tried the Vallejo Environment Snow again. This time by putting a thick blob of that paste and then dusting it with Krycell snow. I think the Vallejo Environment Snow used in this manner is more convincing (the Krycell snow softens the grainy appearance of the Vallejo product and makes it less “stark white”).
I’ll be able to use Krycell snow on my KV-1 diorama soon, so stay tuned!


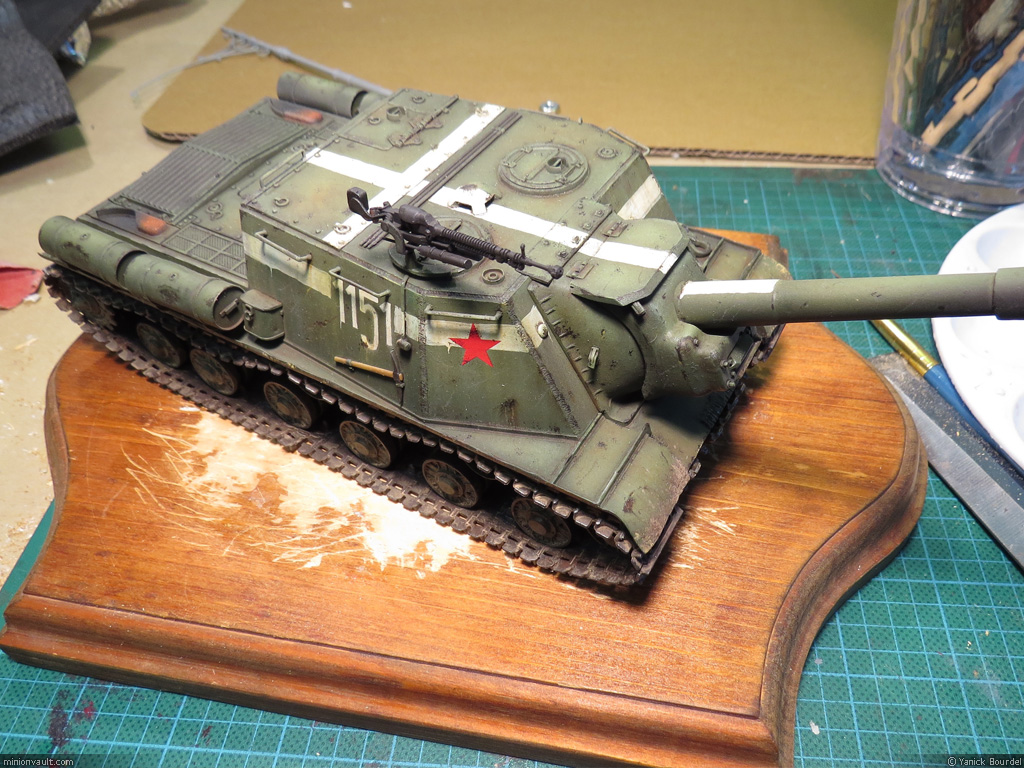
While waiting for my order of Krycell snow to arrive, I started to work on another diorama. This one, for my ISU-152. I decided to document pretty much every steps while doing it, so enjoy the step by step making of this diorama, part 1.
1- The base itself: A simple, and used, bevelled wooden base I had lying around would do the trick here. I had to scrape off some glue and old basing material from the surface with a chisel, then I used a hammer to fix a metal plate in the center, as a support for the bolt that will hold my tank in place.
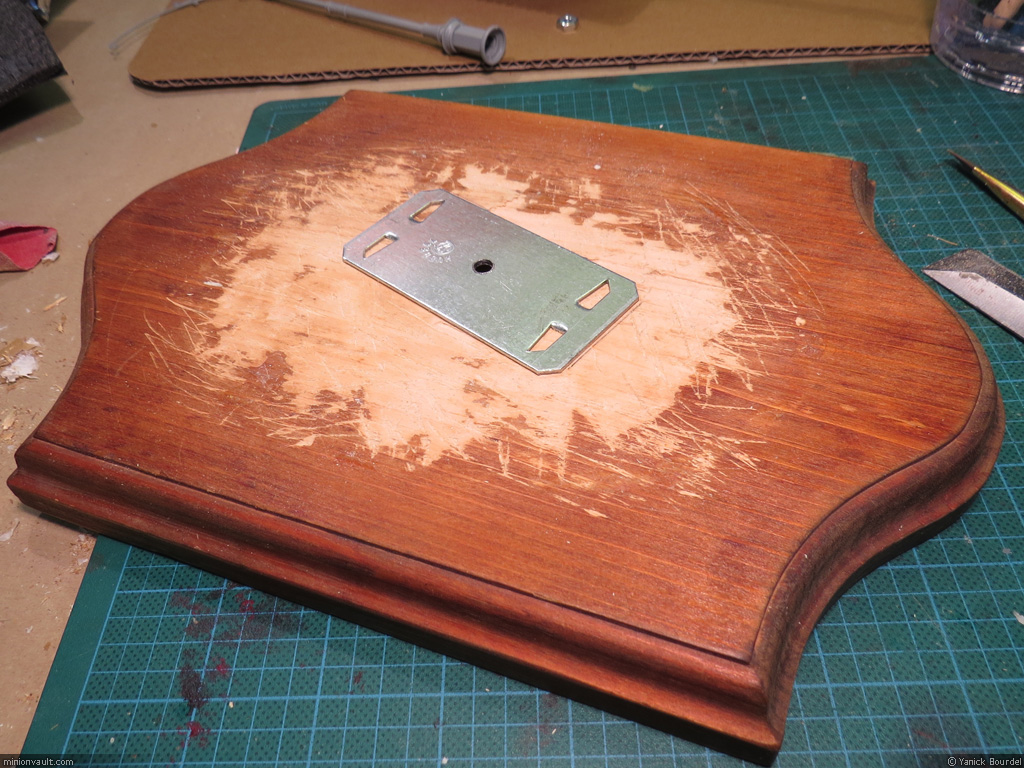
2- I made sure to drill a large hole in the base before, so it will be easy to turn the nut on the screw under the tank.


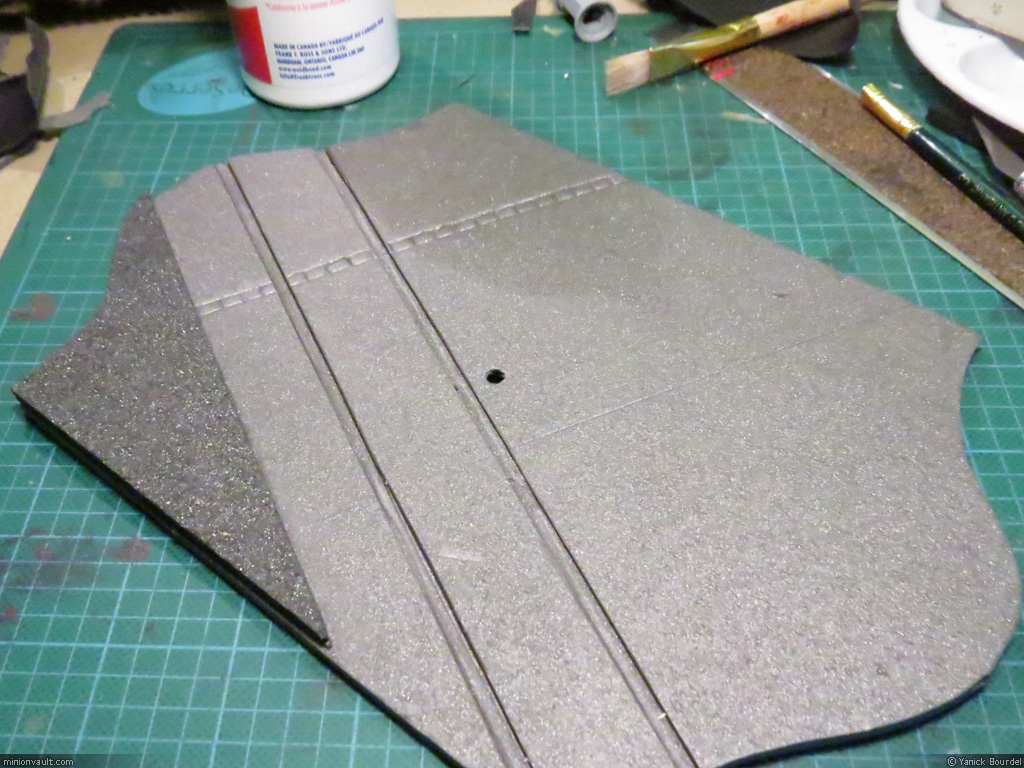
3- Foam core is a nice material to “carve” stone work. I used tracing paper to reproduce the exact shape of the wooden base, then used an X-Acto knife to cut it. I carefully peeled one side of the black cardboard from the foam core. Then I made another shape that I glued on top of the first one: this will become the sidewalk.


4- Using the X-Acto knife and a metal ruler, I carved 2 channels for the Tramway rails.
5- Then… the LONG work: using a custom-made tool (a modified old brush) I began stamping every stone of the pavement. Tedious. But the final effect was worth it, I think.

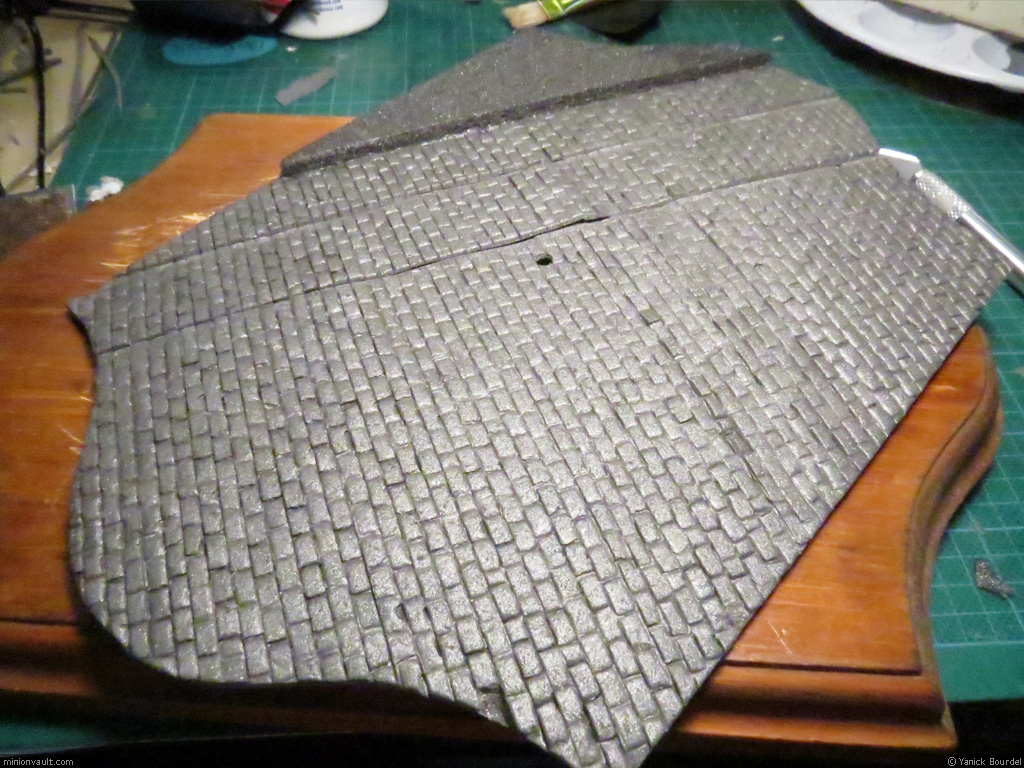
6- I did some carving on the sidewalk and used a small plastic bit to represent a drain cover plate.

7- I scratch builded a sewer manhole too, with left over bits and plasticard.

8- To make the Tramway rails, I glued strips of plasticard in a ” T ” shape. To glue them to the base was a challenge though: white glue won’t glue plastic very well, plastic glue would likely melt the foam core, and the hot glue gun was quite scary to bring close to my delicate foam carving… So I tried to use Tamiya putty, thinking it should bond quite well to both metal and foam. I did a test, but on a scrap piece of a DIFFERENT type of foam… B-I-G MISTAKE!!! It looked fine on the test piece, with very limited melting of the foam. But on my diorama, the Tamiya putty solvent (Acetone I presume now) melted huge patches of pavement… ARGH…..
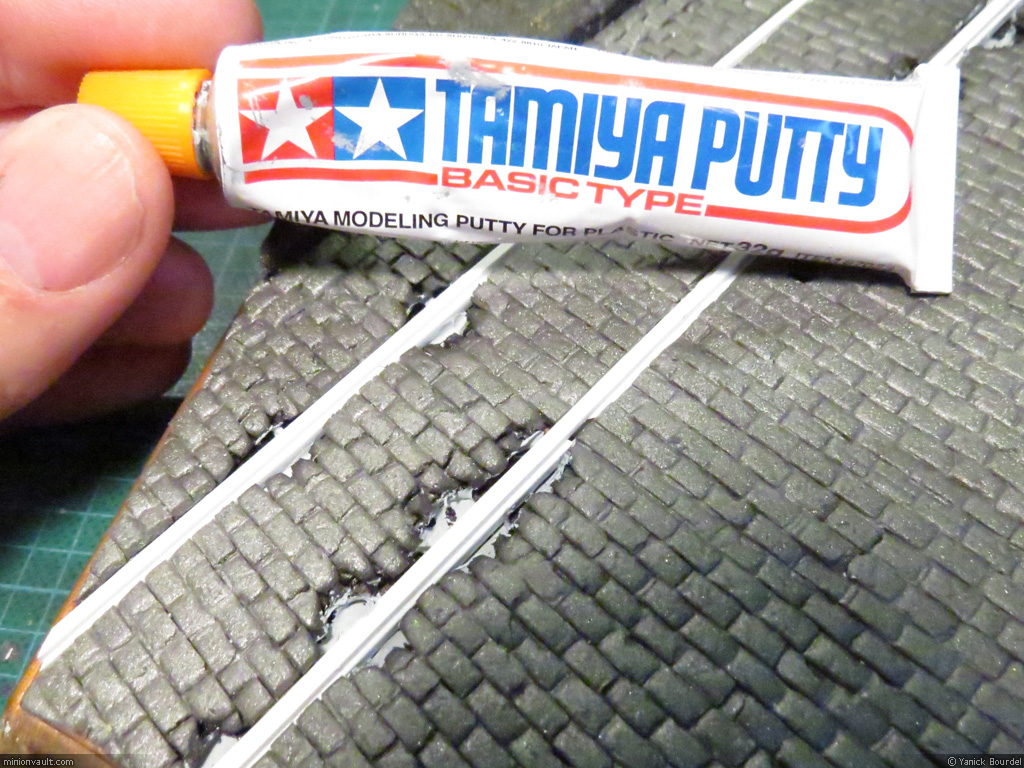
9- So I had to be meticulous and repair individual stones…

10- In the end, the final result is decent and once weathered It will look pretty much the way I wanted. Yeah!


Part 2 of this step by step guide coming soon…
I did some tests recently to create realistic snow for my KV-1 diorama. I’ve made a simple diorama with left over bits and pieces to try different solutions.
So far I have tried the following products to simulate snow:
To make it stick to the diorama, I have used:
As for now, I am stuck and here’s why:
Alas, no solution was satisfactory to simulate snow the way I want…


I then did some research on the net and found this company called Precision Ice and Snow (http://www.precisioniceandsnow.com/) that sells a product that seems promising to achieve the look I want. I just placed an order for their Krycell FINE snow powder. I’ll post my tests with that product as soon as I get it.
So I am now waiting for Santa to bring the white powder to me.
Yeah, I now: that last sentence sounds weird 🙂
I did a bit of work on my KV-1 diorama. I have chosen a curvy, old-fashioned wooden base with a golden trim (now covered in green masking tape). I used Magic-Sculpt putty as a primary material for the ground work, in which I embedded some german army left overs and debris. Once the putty was hard, I brushed white glue on most of the base to add some sand, rocks, branches and grass (fibres). The next day, I painted the ground (and details) and dry brushed it. I still have some touches of color to add with washes and pigments.
A soviet soldier from Mini-Art will be placed on the ground near the tank, boots in the mud.
I also want to put a bit of snow on the ground and I am currently experimenting with different approaches to simulate snow and fresh (humid) mud/slush. More on that soon.
For now, enjoy the pics!


Just a quick update. I did the camouflage on my KV-1 using the hairspray technique. Then, I did a couple of washes in oil (burnt umber and raw umber). Some streaking with a rusty oil color, then stains and engine oil spills (simulated) with oil paint again. After that, I had a blast with pigments. My recipe for a pigment fixer is 1/3 matt varnish, 1/3 white glue and 1/3 water. I start by brushing this mix on the surface (underneath the skirts for example) and I use an old brush to “tap” the area with various shades of brown pigments.
Some chipping was done too, with a small sponge and burnt umber oil paint.
I still have a lot of touch-ups to do, and some details are missing (towing cables, headlight glass, machine-gun barrels, etc). Plus, I have to work on the base / diorama.
I am quite happy with the result so far. What do you think?


Yep! Russian green again…
I just finished the base coat on my Dragon KV-1 tank. A very nice kit, with good quality plastic tracks. It was a charm to assemble. And now it’s painting time…
I plan to white wash this model (winter camouflage): Since it is my 3rd soviet tank model in a row (still working on my IS-3), I am getting tired of all the green…


I just finished the base coat on my IS-3. The colour is the same as my recent ISU-152, so same paints and same techniques…
The model looks a bit darker because of the gloss varnish: It is now ready for washes…


Washes and chipping done! I also began weathering the tracks, rusting the exhausts, blackening the tip of the gun barrel etc.
I still have some retouching to do. Plus I want to lightly spray the model with a subtle mist of Tamiya Buff to simulate dirt and dust.
I still have to finish the DShK machine-gun that goes on the turret too.
Then… the diorama! Yeah!


